
In this blog post I would like to show how we can display data in a browser in real-time after it has been sent by an IoT device. We will see that this isn’t difficult at all if we use and combine the right Azure services. We don’t even have to write a lot of code for it.
Update March 3, 2022 #
This post from 2019 is one of the most popular on my blog in recent years. In the comments it also became clear that several people were building the described solution themselves (which is good to see :-)). But because this post is quite old and some information was no longer up-to-date, they also ran into some issues. That’s why I checked everything again and updated this post where necessary. Happy coding!
What we are going to do #
We will follow a simple IoT scenario in which a device sends a message to the IoT Hub that the web app will display in real-time (without having to refresh the page). In a more real world IoT scenario, that could be telemetry or sensor data such as temperature or humidity coming from the device.
To achieve this we will create and use the following services on Azure:
- IoT Hub
- Function App
- SignalR Service
- Storage Account
IoT Hub is a managed service that acts as a central message hub for communication between your IoT application and the devices it manages. Azure SignalR Service is a fully managed real-time messaging platform that supports WebSockets. We’ll use it in combination with Azure Functions to broadcast ‘Device-To-Cloud’ (D2C) messages to the browser. We will host a very basic web app (one html file) as a Static Website in Azure Storage to show the contents of the D2C message.
In short the process can be described as follows: we will simulate an IoT device with our development machine and send a ‘Device-To-Cloud’ (D2C) message to the IoT Hub. The Azure function will be triggered by this incoming message on the IoT Hub and has an output binding to the SignalR Service. The web app establishes a connection with the SignalR Service and will receive messages sent to the SignalR Service. The web app will update the UI based on the data in the SignalR message. In a diagram the entire process looks like this:

Create the Azure services #
IoT Hub and IoT device #
Let’s start by creating the IoT hub in a new resource group:
az group create -l {region} -n {name}
az iot hub create -g {resource-group} -n {name} --sku F1 -l {region} --partition-count 2
The default value for the IoT hub SKU is F1, which is free. Note that only one free IoT hub instance is allowed in each subscription. If you already have one in your subscription change the SKU to another value to prevent an exception.
Now we can register a new IoT device with the hub. This can be done in the portal or via the CLI but it requires installing the Azure IoT CLI Extension.
az extension add --name azure-iot
With the extension installed we can register a device using the CLI:
az iot hub device-identity create -n {iothub-name} -d {device-id}
SignalR Service #
Provision a free instance of SignalR Service with the following CLI command:
az signalr create -n {name} -g {resource-group-name} --sku Free_DS2 -l {region} --service-mode Serverless
Function App #
A function app requires a storage account so we will need to provision one before creating the function app
az storage account create -n {name} -l {region} -g {resource-group-name} --sku Standard_LRS --kind StorageV2
az functionapp create -n {name} -s {storage-account-name} --consumption-plan-location {region} -g {resource-group-name} --functions-version 3
I specified the --kind parameter to create a General Purpose v2 storage account. This will give us the possibility to host a static website. We will use that for the web client receiving the SignalR messages.
The CLI will automatically create an app service plan with a default name. If you want to specify the name, you have to create the plan before creating the function and add the --plan parameter to the functionapp create command.
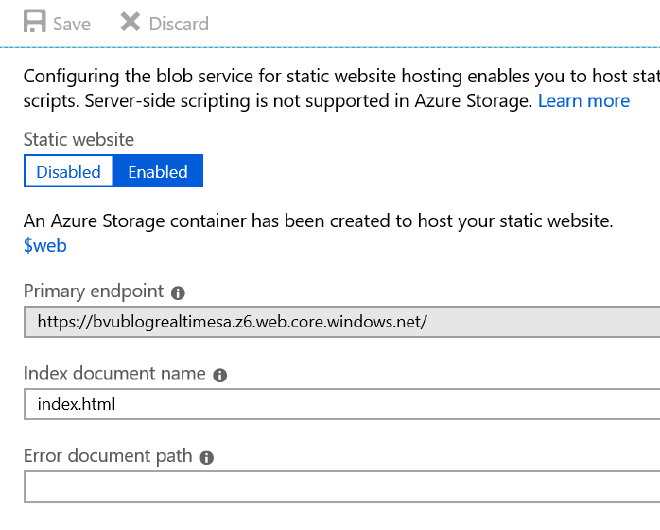
Static website #
In the settings section of the storage account you can find Static website. Open this blade and enable static website. Enter index.html as the index document name and save.
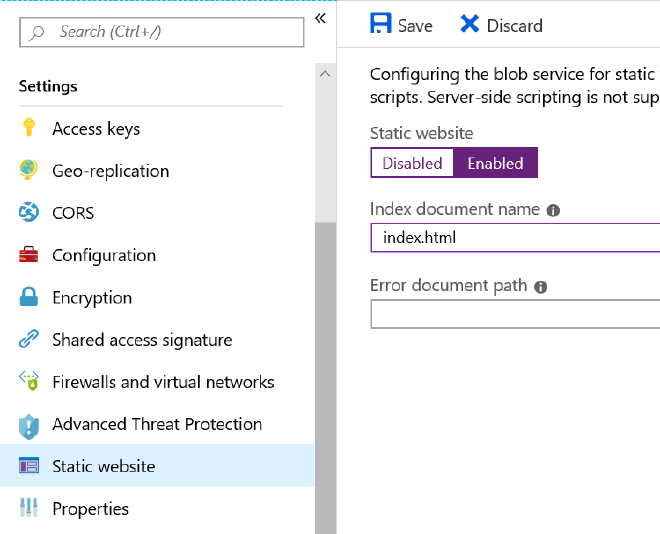
An Azure storage container named $web will be created for us to host the static website. The static website can be reached on the Primary endpoint. We will create the index.html file and upload it to the container later in this post.
Setup IDE and create the project #
Now that we provisioned all the required resources on Azure it’s time to create a new project! In this blog post I will use VS Code but you can use Visual Studio 2019 as well if you prefer.
If you don’t already have them installed, add these two VS Code extension:
- Azure Functions
- Azure IoT Tools
The Azure Functions extension can scaffold out a new Functions project for us. The Azure IoT Hub Toolkit extension is not required, but this will make it easier for use to send D2C messages to the IoT Hub and test our code.
We will use version 3 of the Azure functions runtime because it is the current version and has support for SignalR bindings and IoT Hub trigger. You need to have version 3 of the Azure Functions Core Tools installed to be able to create an version 3 Azure Function App.
npm i -g azure-functions-core-tools@3
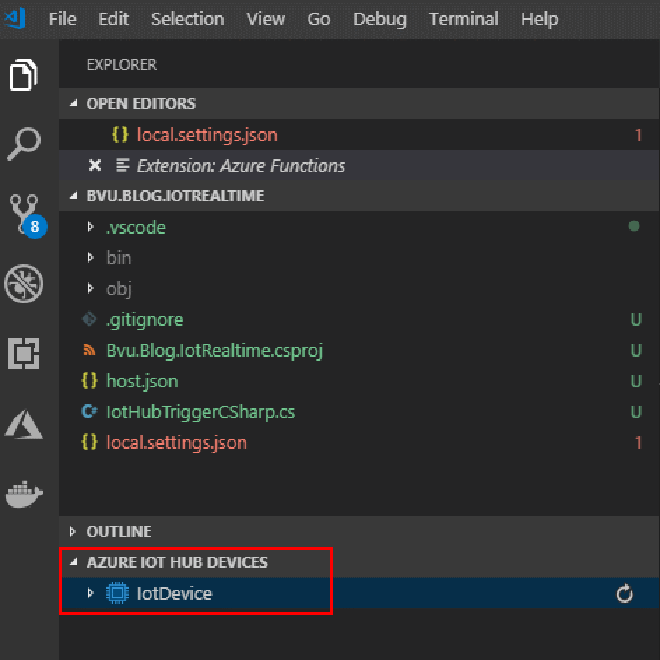
Now make sure you are logged into the your Azure account. Hit Ctrl+Shift+P in VS Code to open the Command Palette and select Azure: Sign in, then select the IoT Hub we provisioned earlier with Azure IoT Hub: Select IoT Hub.
Now the provisioned IoT Device should be visible in the Azure IoT Hub Devices pane in the VS Code Explorer.
Create the Functions project #
Before we create a new Azure Functions project head over to the Azure portal to retrieve the endpoint for the created IoT Hub. Find the IoT Hub and copy the value of Event-Hub compatible endpoint in the Built-in Endpoints blade.
Now we have all the info to create the project. Open the Command Palette and select Azure Functions: Create New Project. Now:
- Select a folder and language (C#)
- Select .NET Core 3 runtime
- Make sure Azure Functions version 3 is the current version
- Select change template filter, select Core and pick IoT Hub (Event Hub)
- Provide a name for the function and namespace
- Create a new local app setting
- Skip the selection of an event hub namespace
- Name of the IoT Hub endpoint to which messages will be sent (use the default value messages/events)
After VS Code is done scaffolding the files you should have a class that looks like this:
public static class IotHubTrigger
{
    private static HttpClient client = new HttpClient();

    [FunctionName("IotHubTrigger")]
    public static void Run([IoTHubTrigger("messages/events", Connection = "")]EventData message, ILogger log)
    {
        log.LogInformation($"C# IoT Hub trigger function processed a message: {Encoding.UTF8.GetString(message.Body.Array)}");
    }
}
Replace the empty string for Connection in the trigger attribute with “IoTHubEndpoint”.
Add the IoTHubEndpoint key-value pair to local.settings.json file. You can find the value for IoT Hub endpoint in the Azure portal under Hub Settings/Built-in endpoints/Event Hub compatible endpoint.
Get the connectionstring for the storage account we created earlier:
az storage account show-connection-string -g {resource-group} -n {name}
and use it as the value for the AzureWebJobsStorage key.
The local.settings.json file should look like this:
{
  "IsEncrypted": false,
  "Values": {
    "AzureWebJobsStorage": "DefaultEndpointsProtocol=https;AccountName=**************",
    "FUNCTIONS_WORKER_RUNTIME": "dotnet",
    "IoTHubEndpoint": "Endpoint=sb://***********************"
  }
}
This should be enough to receive messages sent from the IoT device. Run the function and wait till it is ready. Right-click on the IoT Device in the Azure IoT Hub Devices pane and select Send D2C Message to IoT Hub. Type a messagee and hit enter. You should see the message in the Azure functions log.

As you can see in the logs, the function was triggered by the message that was sent to the IoT Hub and it executed successfully. The next step is to extend the Azure function to forward the message to SignalR.
Send SignalR message #
We will use the SignalR Service bindings for Azure functions to send a SignalR message to all connected clients. They are provided in the Microsoft.Azure.WebJobs.Extensions.SignalRService NuGet package
dotnet add package Microsoft.Azure.WebJobs.Extensions.SignalRService
Add the output binding as a parameter to the Run method of the Azure Function:
[SignalR(HubName = "MyHub")]IAsyncCollector<SignalRMessage> signalRMessages
Provide a value for the HubName property of the SignalR binding.
Inside the Run method add the following code to create the SignalR message and add it to the IAsyncCollector<SignalRMessage> object.
await signalRMessages.AddAsync(
    new SignalRMessage
    {
        Target = "iotMessage",
        Arguments = new[] { Encoding.UTF8.GetString(message.Body.Array) }
    })
    .ConfigureAwait(false);
The Target is the name of the method to be invoked on the client when receiving the message. The Arguments property is an array of zero or more objects to be passed to the client method. In our case we just forward the message we received from the IoT device.
The class should now look something like this:
public static class Functions
{
    [FunctionName("IotHubTrigger")]
    public static async Task Run(
      [IoTHubTrigger("messages/events", Connection = "IoTHubEndpoint")]EventData message,
      [SignalR(HubName = "MyHub")]IAsyncCollector<SignalRMessage> signalRMessages,
      ILogger log)
    {
        var messageFromIoTDevice = Encoding.UTF8.GetString(message.Body.Array);
        log.LogInformation($"C# IoT Hub trigger function processed a message: {messageFromIoTDevice}");

        await signalRMessages.AddAsync(
            new SignalRMessage
            {
                Target = "iotMessage",
                Arguments = new[] { messageFromIoTDevice }
            })
            .ConfigureAwait(false);
    }
}
We need to add the SignalR service ConnectionString to local.appsettings.json. You can find the value in the Azure Portal in the Connection strings blade. Take the one under For access key. Add this value to a new key-value pair AzureSignalRConnectionString.
While your there check the Settings blade and make sure Serverless is selected as Service Mode. The default mode will result in errors in the web page when initiating a connection to SignalR Service. Thanks to Hassan Shabbir for pointing this out in the comments!
{
  "IsEncrypted": false,
  "Values": {
    "AzureWebJobsStorage": "DefaultEndpointsProtocol=https;AccountName=**************",
    "FUNCTIONS_WORKER_RUNTIME": "dotnet",
    "IoTHubEndpoint": "Endpoint=sb://***********************",
    "AzureSignalRConnectionString": "Endpoint=https://****************;AccessKey=*******"
  }
}
Connect client to SignalR Service #
Now we need to add a second function that the web client will use to make a connection with the SignalR service.
        [FunctionName("negotiate")]
        public static SignalRConnectionInfo GetSignalRInfo(
            [HttpTrigger(AuthorizationLevel.Anonymous, "post")] HttpRequest req,
            [SignalRConnectionInfo(HubName = "MyHub")] SignalRConnectionInfo connectionInfo)
        {
            return connectionInfo;
        }
The SignalRConnectionInfo input binding is used to generate and return valid connection information to the web client that will call this HTTP endpoint when it wants to establish a connection with SignalR.
In case you want to test locally whether the client can make a connection, you need to add the following to local.settings.json:
"Host": {
    "LocalHttpPort": 7071,
    "CORS": "http://127.0.0.1:5500",
    "CORSCredentials": true
  }
The value for CORS is the URL of the web client.
Create the web app #
Add a index.html file to the project. We are going to limit the contents of the HTML file to a minimum. We will only write some code to connect to SignalR and show incoming messages from the IoT device on screen. Add to following code to the HTML file:
<html>
    <head>
        <script src="https://cdn.jsdelivr.net/npm/@aspnet/signalr@1.1.2/dist/browser/signalr.js"></script>
        <script>
                const connection = new signalR.HubConnectionBuilder().withUrl("http://localhost:7071/api").build();

                connection.on("iotMessage", function (messageFromIoTDevice) {
                    document.getElementById("message").innerHTML = messageFromIoTDevice;
                });

                connection.onclose(() => console.log('disconnected'));
                console.log('connecting...');
                connection.start()
                  .catch(console.error);

        </script>
    </head>
    <body>
        <p id="message"></p>
    </body>
</html>
First we include the signalR javascript library, then we build up a connection to SignalR by using the HubConnectionBuilder. The URL we use in WithUrl is the endpoint of the negotiate function in the Function App (without the last url segment ‘/negotiate’).
To receive messages from the hub, we define a method using the on method of the HubConnection. The name of the method has to match the Target property of the SignalR message we create in the Azure Function.
The Arguments property of the message will be passed to the method. In our case it is the message from the IoT device that will be passed to the messageFromIoTDevice argument and shown in the message paragraph.
Finally we call connection.start() to establish a connection with SignalR.
Test locally #
Now we should have done all the work to test locally. Run the Function App and the static website. I use the VS Code extension Live Server to run the index.html file on localhost. Just make sure the CORS value in local.settings.json of the Function App is the URL of the static website. Now use VS Code to send another D2C message. If all went well you should see the message you sent appear on the webpage.

Deploy #
That’s all very nice, but what we really want is to run this on Azure, dont we? So let’s deploy our Function App and web client to Azure and see if it still works.
To deploy the Function App to the Azure enter Azure Functions: Deploy to Function App in the VS Code command palette and select the Function App we created earlier. When the deployment is done you can get the URL of the negotiate function in the Output window of VS Code. Copy this value (without ‘/negotiate’) and replace the URL in WithUrl in index.html with this value.
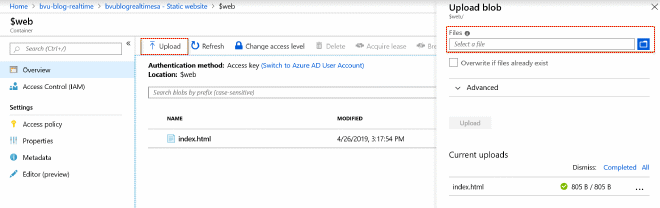
Now save and upload index.html to the $web blob container of the Storage Account.
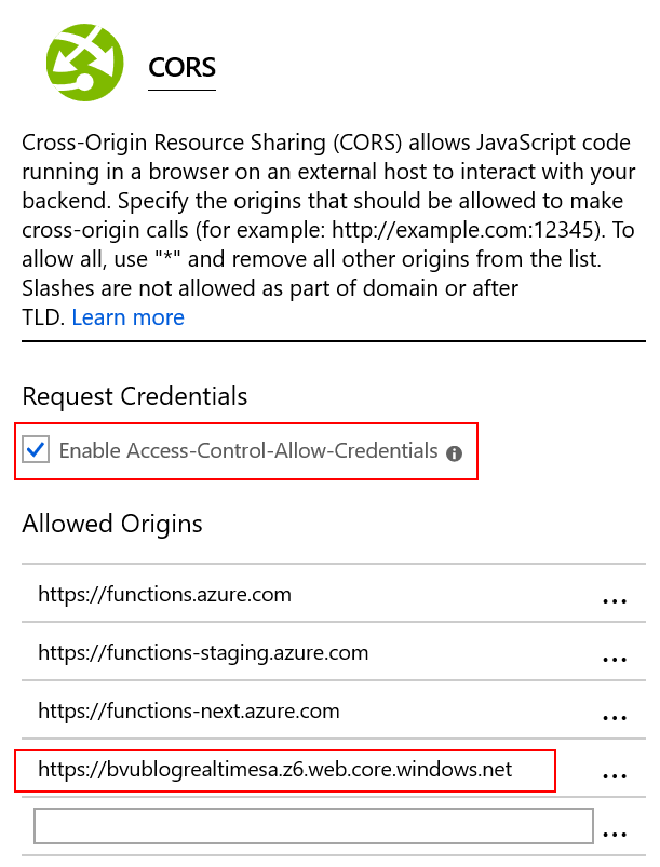
Go to the Azure Function in the Azure Portal and add IotHubEndpoint and AzureSignalRConnectionString to Application Settings in the Configuration blade. You can copy the values from local.settings.json. We need to cofigure CORS to be able to call this function from our static website. Navigate to the CORS blade, enable Access-Control-Allow-Credentials and add the static website URL to the list of Allowed Origins.
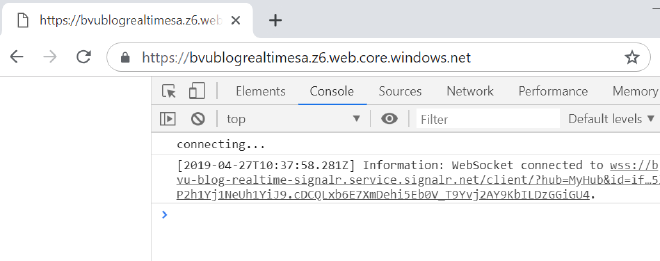
Browse to the URL of the static website and make sure it can connect to SignalR.
Test in the cloud #
Now that we have the Function App and static website running in Azure we can test once again by sending a D2C message from VS Code:
VS Code sends a D2C message to the IoT Hub, this will trigger the Azure function to create and send a SignalR message. The web app receives this messages and displays it on screen.
Summary #
In this blog post we saw how to display data coming from an IoT device in real-time in the browser. Using the right services in Azure makes this quite easy. Because we use the free versions of IoT Hub and SignalR Service in combination with Azure Functions consumption plan and a static website hosted on a storage account this is also a very cost efficiet solution.
Sources #
The source code for this blog post is available on GitHub.
Sources used and recommended for further reading: