
In this two part blog post we will add an dynamic floor plan to a webpage. We will use SVG (Scalable Vector Graphics) to create the floor plan. When an alert is raised based on sensor values in a room we will use Azure Digital Twins, Event Grid, Azure Functions and Azure SignalR Service to dynamically and in near real-time restyle the corresponding room on the floor plan.
In this first part we will cover creating the floor plan with SVG, uploading it to Azure Digital Twins and displaying it on a a webpage. The second part will go into the process of updating the SVG in realtime based on sensor values coming from an IoT device registered with the Azure Digital Twin.
Introduction #
A dynamically changing floor plan was a feature I remembered from the Hotel360 demo from Connect() 2017 and I wanted to implement this in a project I was working on that implemented the smart building concept with Azure Digital Twins. Because the Hotel360 demo website was offline and I couldn’t find the source code on GitHub I had to figure out how to do it myself. I’m writing this blog post so that others may benefit from my findings ;-)
In this post I assume you have some knowledge about Azure Digital Twins and maybe already have one running in Azure. I will not cover topics like creating and configuring Azure Digital Twins or connecting an IoT device to Azure Digital Twins because this can be found in the official docs and sample repos provided by Microsoft.
If you are new to Azure Digital Twins and want to learn more I can recommend the following resources:
If you would like to get started, have a look at this:
Create the floor plan #
We will create the floor plan as a SVG (Scalable Vector Graphics). Why SVG? Files in this format use an XML-based text format to describe how the image should appear. This means we can change the appearance of the graphic by changing the XML. And ofcourse this can be done dynamically with some code.
We will be using Inkscape to create the SVG file. Inkscape is a professional vector graphics editor for Linux, Windows and macOS. It’s also free and open source.
Start by creating a new document in Inkscape. If you have digital copies of the building blueprints, you can use them as a background image. Then you can draw the walls and rooms over it. I used separate layers for the background, walls and rooms. This makes it easier to hide or lock certain elements while creating or editing others and results in better readable XML. I leave the styling up to you. For the building I was modelling this was the result:
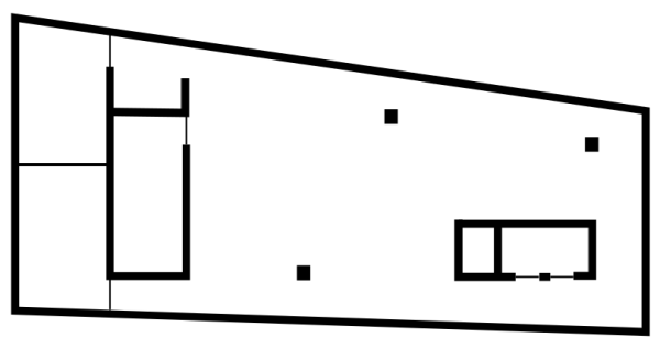
The upper left room is also a Space in the Azure Digital Twin and has an IoT device that measures the room temperature and humidity. When the temperature in the room exceeds a certain threshold value we want to update the floor plan and change the fill color of the room to indicate that the room is too hot. In order to do this we need to be able to identify the room in the SVG. For this we will set the object Id in the SVG to the same value as the Id of the space in Digital Twins.
I use Postman to interact with the REST endpoints of Azure Digital Twins. The docs for the endpoints can be found here, and here is information on how to configure Postman for Azure Digital Twins.
Open Postman and call the Spaces endpoint to get all spaces in your Digital Twin. Search for the room in the returned list of spaces and make a note of the Id.
In Inkscape open object properties (Shift+Ctrl+O), select the room object and set the Id property to the Id of the space you just noted down. To make it easier to find the object in XML you can also add a description.
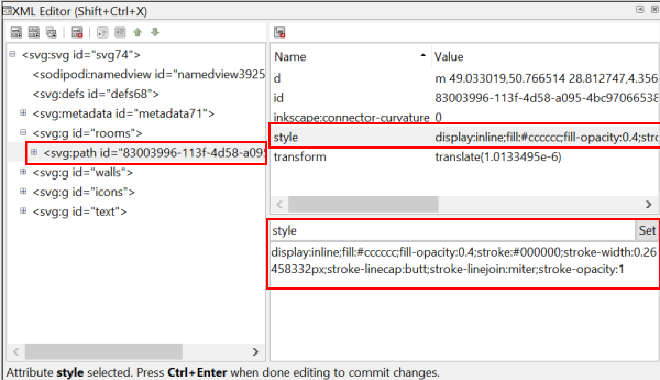
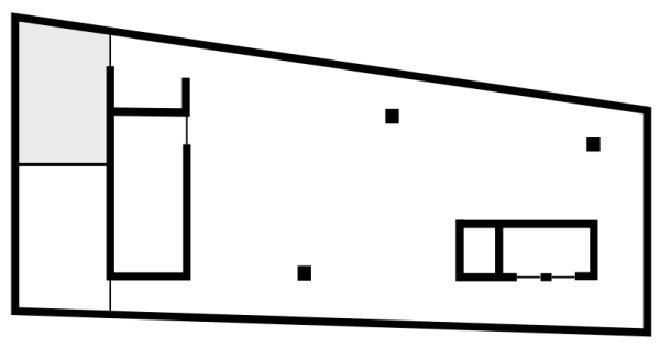
Next we want to do some initial styling. In Inkscape open XML editor (Shift+Ctrl+X), select the room object and select the style attribute in the editor. Add fill color and fill opacity to the style attribute, for instance fill:#cccccc;fill-opacity:0.4. If you want to indicate that some form of interaction with the room object is possible, like show the temperature and humidity when a user clicks on the room, add cursor:pointer to the style attribute. Don’t forget to press Ctrl+Enter or to click the set button to save the changes.
You can repeat this process for multiple rooms or areas on the floor plan. For this blog post we will keep it simple and stick with one room.
When you are done, save the image as a Plain SVG this will prevent all the Inkscape specific metadata from being saved.
Add the floor plan to Digital Twins #
Now that we have our SVG file we can add it to our Digital Twin. Azure Digital Twins supports attaching files (blobs) to spaces (and devices, users). A building floor is usually also a space in Digital Twins. And for this blog post this is also the case. So let’s add the SVG file as a blob to this floor.
Open Postman and call the Spaces endpoint to get all spaces in your Digital Twin. Now find the floor and make a note of the Id.
Create a text file with the following JSON object holding the metadata for the SVG file
{
    "parentId": "6aa75e4c-608c-445b-a5d6-******",
    "name": "Floor plan 11",
    "type": "Map",
    "subtype": "GenericMap",
    "description": "Floor plan of the 11th floor",
    "sharing": "None"
}
The value for the parentId property is the Id of the floor you just noted down. And in the type property we specify that the SVG we are about to upload as a blob is a Map.
Save the text file and go back to Postman to make a POST request on the Spaces/Blobs endpoint.
Add a Content-Type header with value multipart/mixed.
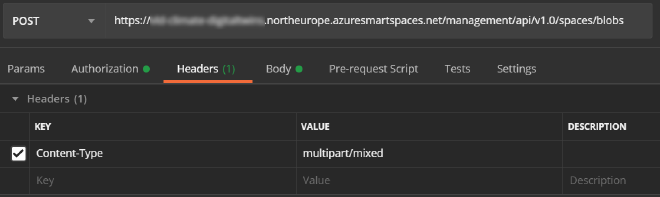
Choose a form-data body and add the keys metadata and map. The value for metadata is the text file you just created and the value for map is the SVG file for the floor plan.
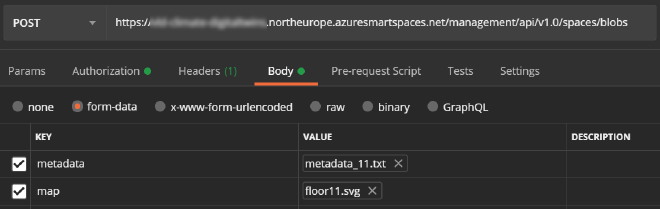
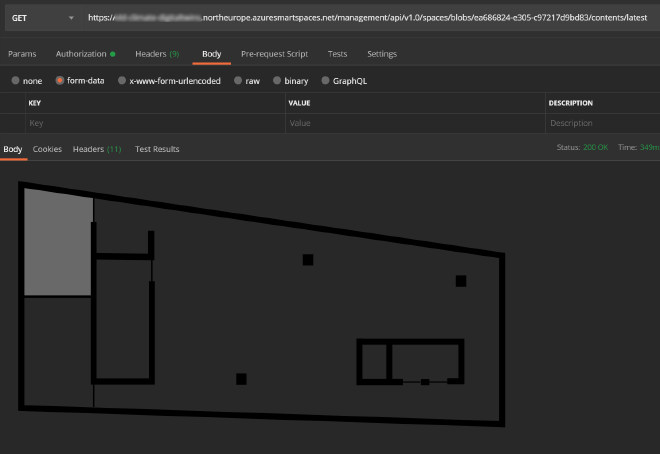
Now hit Send. If all went well you will get a 201 response code indicating that the SVG file is added as a blob to the floor space. The id of the created blob can be found in the response body. You should be able to see the SVG by calling the spaces/blobs/{{blob-id}}/contents/latest endpoint.
Show the floor plan on the website #
We will build the website with ASP.NET Core. In the web application we create a helper class to interact with the Azure Digital Twins endpoints and a custom Tag Helper to show the SVG floor plan on a webpage.
Retreive the blob from Digital Twins #
For the project I was working on we created a class (DigitalTwinsService) and interface (IDigitalTwinsService) with helper methods to make it easier to interact with the Digital Twins REST endpoints. It is beyond the scope of this blog post to go in to the details of most of these methods. The class is heavily based on the code in this sample project, so take a look there if you want to go more in depth.
We will take a look at the GetSpaceMapStreamAsync method which is responsible for retrieving the SVG from Digital Twins.
using Newtonsoft.Json;
using System.Collections.Generic;
using System.IO;
using System.Linq;
using System.Net.Http;
using System.Threading.Tasks;

namespace Bvu.DigitalTwins.Web.Services
{
    public class DigitalTwinsService : IDigitalTwinsService
    {
         private readonly HttpClient _httpClient;

        public DigitalTwinsService(HttpClient httpClient)
        {
            _httpClient = httpClient;
        }

        public async Task<MemoryStream> GetSpaceMapStreamAsync(
            string id,
            string version = "latest")
        {
            await PrepareAuthenticatedClient();

            var mapsFilter = $"$filter=ParentId eq guid'{id}' and TypeId eq 53"; // Map
            var response = await _httpClient.GetAsync($"spaces/blobs{MakeQueryParams(new[] { mapsFilter })}");

            if (response.IsSuccessStatusCode)
            {
                var content = await response.Content.ReadAsStringAsync();
                var blob = JsonConvert.DeserializeObject<IEnumerable<Blob>>(content);

                if (blob.Any())
                {
                    // assuming we only have one blob of type map per space
                    var blobContentsResponse = await _httpClient.GetAsync($"spaces/blobs/{blob.First().Id}/contents/{version}");

                    if (blobContentsResponse.IsSuccessStatusCode)
                    {
                        var memorystream = new MemoryStream();

                        using (var stream = await blobContentsResponse.Content.ReadAsStreamAsync())
                        {
                            await stream.CopyToAsync(memorystream);
                        }
                        memorystream.Position = 0;
                        return memorystream;
                    }
                }
                throw new HttpRequestException($"No map blobs found for space: {id}.");
            }
            throw new HttpRequestException($"Invalid status code in the HttpResponseMessage: {response.StatusCode}.");
        }

        private static string MakeQueryParams(IEnumerable<string> queryParams)
        {
            if (queryParams.Any(s => !string.IsNullOrWhiteSpace(s)))
            {
                return queryParams
                    .Where(s => !string.IsNullOrWhiteSpace(s))
                    .Select((s, i) => (i == 0 ? '?' : '&') + s)
                    .Aggregate((result, cur) => result + cur);
            }
            return string.Empty;
        }
    }
}

public class Blob
{
    public string Id { get; set; }
    public string Name { get; set; }
    public string ParentId { get; set; }
    public int TypeId { get; set; }
    public int SubTypeId { get; set; }
    public string Sharing { get; set; }
}
The space id of the floor needs to be passed as a parameter to the method.
The PrepareAuthenticatedClient method ensures that the HttpClient we use to make calls to the Digital Twins REST API is properly authenticated. It’s beyond the scope of this post to go into the authentication details.
We use the authenticated http client to call the spaces/blobs endpoint to get the available blobs. We add a querystring to the request to only return blobs for the specified space (the floor) and which are specified as Map (TypeId eq 53). Remember we specified the blob to be a map type in the JSON object we used in the post request? If a map blob is found for the floor we call the contents endpoint for the blob to retrieve the SVG and return it as a MemoryStream.
Show SVG on the webpage #
There are several options for adding an SVG to a webpage. We can use the <object>, <embed> and <iframe> tags. These options use links to SVG files which prevent us from interacting with specific XML elements in the SVG. We need to use the SVG inline if we want to interact with SVG elements through JavaScript. This can be done using the <svg> tag.
To load the SVG on the webpage we will create a custom TagHelper that will create a <span> tag with the XML contents (contained in a <svg> tag).
namespace Bvu.DigitalTwins.Web.Helpers
{
    using System.IO;
    using System.Threading.Tasks;
    using Microsoft.AspNetCore.Razor.TagHelpers;
    using Bvu.DigitalTwins.Web.Services;

    [HtmlTargetElement("floorplan", TagStructure=TagStructure.WithoutEndTag)]
    public class FloorplanTagHelper : TagHelper
    {
        private readonly IDigitalTwinsService _digitalTwinsService;

        // Can be passed via <floorplan space-id="..." />.
        // PascalCase gets translated into kebab-case.
        public string SpaceId { get; set; }

        public FloorplanTagHelper(IDigitalTwinsService digitalTwinsService)
        {
            _digitalTwinsService = digitalTwinsService;
        }

        public override async Task ProcessAsync(TagHelperContext context, TagHelperOutput output)
        {
            using (var stream = await _digitalTwinsService.GetSpaceMapStreamAsync(SpaceId))
            {
                using (var streamReader = new StreamReader(stream))
                {
                    var svg = await streamReader.ReadToEndAsync();

                    output.TagName = "span";
                    output.TagMode = TagMode.StartTagAndEndTag;
                    output.Content.SetHtmlContent(svg);
                };
            };
        }
    }
}
In the tag helper we call the GetSpaceMapStreamAsync method on the DigitalTwinsService. The id of the space (the floor) will be passed from the tag helper’s space-id attribute. Next we read the returned MemoryStream and put the SVG string into a <span> tag.
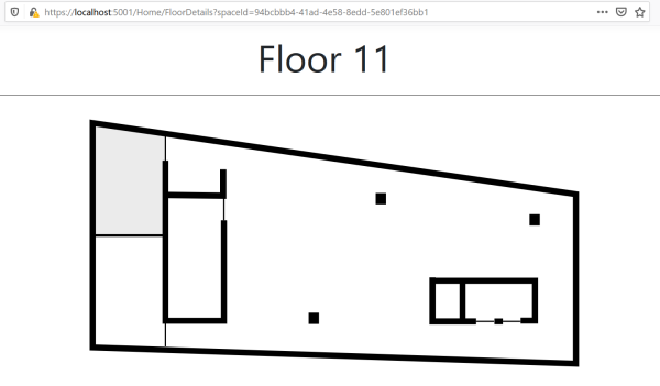
Now we can add the custom tag to the Razor view. Open the view where you want to display the floor plan, add the @addTagHelper directive to the view (@addTagHelper *, Bvu.DigitalTwins.Web) to make the Tag Helper available and then add the custom tag <floorplan space-id="@Model.Id" />. The value of the Id property on the Model should be the space id of the floor so make sure to provide a valid model to the view.
When rendered on the webpage the floor plan should be visible:
And when looking at the source code, the html will look something like this:
<span>
    <!--?xml version="1.0" encoding="UTF-8" standalone="no"?-->
    <svg>
        <g id="rooms">
            <path id="83003996-113f-4d58-a095-4bc970665382" d="m 49.033019,50.766514 28.812747,4.356658 -3e-6,40.228488 -28.624218,8e-6 -0.188526,-44.585154" style="display:inline;fill:#ccc;stroke:#000000;stroke-width:0.26458332px;stroke-linecap:butt;stroke-linejoin:miter;stroke-opacity:1;fill-opacity:0.4;cursor:pointer" transform="translate(1.0133495e-6)">
            <desc id="desc4657">Conference Room V11 Right</desc>
    </path>
        </g>
        <g id="walls"></g>
    </svg>
</span>
The path element is the room object we edited earlier in Inkscape and should have the room’s space id as the id and the updated style attribute. Having the room as a html element makes it easy to interact with using JavaScript. We will cover this in the next blog post.
Summary #
In this first part we created a SVG file for the floor plan and added it as a blob to the floor space in Azure Digital Twins. We set the id property of a room on the floor plan so we can interact with it later with some JavaScript code. Next we retrieved the SVG from Digital Twins and displayed it on a webpage using a custom tag helper.
In the next post we will change the styling of the room in real time when the temperature of the room exceeds a threshold value.
Resources #
Digital Twins:
- Introduction to Azure Digital Twins
- Gettings started with Azure Digital Twins
- Digital Twins Service Management APIs
- GitHub digital-twins-samples-csharp
Postman: