
In this post we will focus on the dynamic part of the title of this blog post. We will restyle the floor plan (change the SVG) in the web application in (near) real-time when, based on some incoming sensor data, an event is triggered in the Digital Twin. For this we will use Azure Event Grid, Functions and SignalR Service.
This post is the second part of a two-part blog post. In the first blog post we focused on creating the floor plan as a SVG (Scalable Vector Graphics), adding that floor plan as a blob to the floor space in Azure Digital Twins and displaying it with the help of a custom tag helper in an ASP.NET Core Web application.
Dynamically update the floor plan #
For an overview, let’s first look at the steps we will go through to get from a temperature measurement on the IoT device to the update of the floor plan on the web application:
- An IoT device sends a message with the value of a temperature sensor to our instance of Azure Digital Twins
- A matcher monitors the temperature values sent to the Digital Twin
- A UDF (user-defined function) executes when a temperature value is received by the matcher
- The UDF triggers a UdfCustom Event if the temperature exceeds a threshold value
- This event is then routed to a Event Grid Topic
- An Azure Function is subscribed to this event grid topic and triggers when an event is raised
- The Azure Function receives the event payload and creates and sends a SignalR message based on the contents of this payload
- The web application receives the SignalR message and updates the floor plan based on the contents of this message.
Now that you have an overview of the steps and processes involved we can get into a little bit more detail. Let’s start with the UDF (the user-defined function) and UdfCustom Event.
Create event: User-defined function #
As stated in the previous blog post, I assume that you are familiar with Azure Digital Twins and therefore also with matchers and UDF. But for those who are not, I will give a very short intro. Check the links in the resources section if you need more information.
Matchers are a set of specific conditions to monitor in the device or sensor data. User-defined functions (UDF) are custom JavaScript code that can run within an Azure Digital Twins instance, when specific conditions as described by the matchers occur. For each matcher we need to specify a UDF. It is possible to use the same UDF with multiple matchers. In this blog post we will assume we only have one matcher, which monitors the temperature, and a connected UDF.
The following UDF finds the sensor that sent the incoming telemetry. Because we have a one-on-one connection between matcher and UDF we can be sure that this is the temperature sensor and that the value is a temperature value. So there is no need to check the datatype of the sensor. Then it finds the space where the sensor is placed. When the temperature value from the sensor is higher than the treshold temperature of 25 degrees Celcius it creates a notification for that space with a JSON payload.
function process(telemetry, executionContext) {
    // Get sensor metadata
    var sensor = getSensorMetadata(telemetry.SensorId);

    // Get latest value for temperature sensor
    var temperatureValue = getFloatValue(sensor.Value().Value);

    // Get parent space for sensor
    var parentSpace = sensor.Space();

    if(temperatureValue > 25) {
        // Set up notification for temperature alert
        const alertInfo = {
            "isAlert": true,
            "dataType": "temperature",
            "value": temperatureValue
            }
        parentSpace.Notify(JSON.stringify(alertInfo));
    }
}
The Notify method will trigger a UdfCustom Event. This event can be send to Azure Event Hubs, Azure Service Bus topics, or Azure Event Grid for further processing.
We will use Azure Event Grid to collect the UdfCustom event from our Azure Digital Twins instance, and redirect them to an event handler. The handler takes some further action to process the event.
To enable this we first need to create an Event Grid Topic and add it as a new Endpoint on our Digital Twins.
Collect event: Azure Event Grid #
First create a new Azure Event Grid Topic and make note of the Key 1 and Key 2 in the Access Keys blade.
Now make a POST request on the endpoints endpoint of your Digital Twins API with the following JSON body:
{
  "type": "EventGrid",
  "eventTypes": [
      "UdfCustom"
  ],
  "connectionString": "KEY 1",
  "secondaryConnectionString": "KEY 2",
  "path": "TOPIC_NAME.LOCATION-1.eventgrid.azure.net"
}
Put the Key 1 and Key 2 values from the access keys blade in the connectionString and secondaryConnectionstring properties. The path is the base URL of the Management API (without the https://) URL. You can find this on the overview blade.
The eventTypes property is an array of event types the endpoint will collect. Besides the UdfCustom event type the SensorChange, SpaceChange and TopologyOperation event types are also supported by EventGrid. For this blog post we only need to listen to UdfCustom events but you can add other event types if you need them for your application.
UdfCustom events raised by the Digital Twin will now be routed to the Azure Event Grid topic. Next step is to create the handler that will further process the event. We will create and use an Azure Function as the event handler.
Handle event: Azure Function #
Create a new Azure Functions project and a function with an Event Grid trigger:
using Microsoft.Azure.WebJobs;
using Microsoft.Azure.EventGrid.Models;
using Microsoft.Azure.WebJobs.Extensions.EventGrid;
using Microsoft.Extensions.Logging;
using Newtonsoft.Json;
using System.Threading.Tasks;

namespace Bvu.DigitalTwins.Functions
{
    public static class EventGridUdfCustomFunction
    {
        [FunctionName("EventGridUdfCustomFunction")]
        public static async Task Run([EventGridTrigger]EventGridEvent eventGridEvent, ILogger log)
        {
            if (eventGridEvent.EventType == "UdfCustom")
            {
                var eventGridEventData = eventGridEvent.Data.ToString();
                var udfCustomEvent = JsonConvert.DeserializeObject<UdfCustomModel>(eventGridEventData);
                log.LogInformation(eventGridEventData);
            }
            else
            {
                log.LogInformation("Not an UdfCustom event");
            }
        }
    }

    public class UdfCustomModel
    {
        public string TopologyObjectId { get; set; }
        public string ResourceType { get; set; }
        public string Payload { get; set; }
        public string CorrelationId { get; set; }
    }
}
The Event Grid trigger and bindings are provided in the Microsoft.Azure.WebJobs.Extensions.EventGrid NuGet package
dotnet add package Microsoft.Azure.WebJobs.Extensions.EventGrid
The function binds to EventGridEvent. We inspect its EventType property to make sure we are processing a UdfCustom event. As a result, we now know that the data property on the JSON object has the properties defined in the UdfCustom event JSON schema:
{
  "id": "568fd394-380b-46fa-925a-ebb96f658cce",
  "subject": "UdfCustom",
  "data": {
    "TopologyObjectId": "7c799bfc-1bff-4b9e-b15a-669933969d20",
    "ResourceType": "Space",
    "Payload": "\"String containing the payload\"",
    "CorrelationId": "568fd394-380b-46fa-925a-ebb96f658cce"
  },
  "eventType": "UdfCustom",
  "eventTime": "2018-10-02T06:50:15.198Z",
  "dataVersion": "1.0",
  "metadataVersion": "1",
  "topic": "/subscriptions/YOUR_TOPIC_NAME"
}
The UdfCustomModel class is used to deserialize the data property of the JSON object to.
We don’t do anything with this data yet, but we will get to that later. Right now it’s time to subscribe this function to the Event Grid Topic we created earlier.
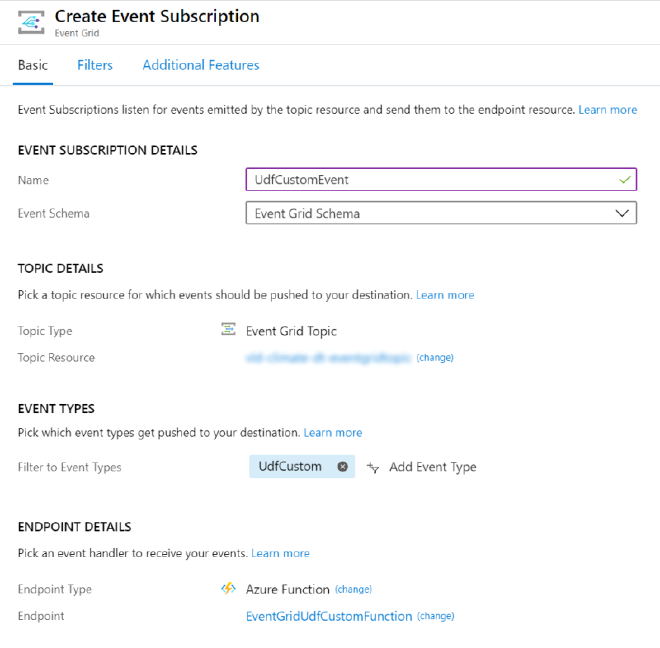
Publish the project to a Function App on Azure, navigate to it in the portal, open the EventGridUdfCustomFunction and click on the Add Event Grid subscription (it’s located next to the run button).
Fill in the form and make sure to pick Event Grid Schema for Event Schema, Event Grid Topics for Topic Types and select the Event Grid Topic created earlier as Topic Resource. You can also filter on UdfCustom events to make sure the function only triggers on this event type.
The completed form should look something like this:
Create message: Azure SignalR Service #
We have an Azure Function that will trigger when a UdfCustom event is raised by the Azure Digital Twins. But besides some logging it doesn’t do much yet. We still need to get the data to the web application. To achieve this we will leverage Azure SignalR Service.
Create a SignalR Service in the Azure portal, navigate to the Keys blade and make a note of the ConnectionString. Open the local.settings.json file in the Azure Functions project and add the connectionstring to a new key-value pair AzureSignalRConnectionString.
{
  "IsEncrypted": false,
  "Values": {
    "AzureWebJobsStorage": "DefaultEndpointsProtocol=https;AccountName=**************",
    "FUNCTIONS_WORKER_RUNTIME": "dotnet",
    "AzureSignalRConnectionString": "Endpoint=https://***********************"
  }
}
We will use the SignalR Service bindings for Azure Functions (only supported for v2) to send a SignalR message to all connected clients. The bindings are provided in the Microsoft.Azure.WebJobs.Extensions.SignalRService NuGet package
dotnet add package Microsoft.Azure.WebJobs.Extensions.SignalRService
Add the output binding as a parameter to the Run method of the Azure Function:
[SignalR(HubName = "NotificationHub")] IAsyncCollector<SignalRMessage> signalRMessages
Provide a value for the HubName property of the SignalR binding.
Inside the Run method add the following code to create the SignalR message and add it to the IAsyncCollector<SignalRMessage> object.
await signalRMessages.AddAsync(
    new SignalRMessage
    {
        Target = "UdfCustom",
        Arguments = new[] {
            udfCustomEvent.TopologyObjectId,
            udfCustomEvent.ResourceType,
            udfCustomEvent.Payload,
            udfCustomEvent.CorrelationId
        }
    });
The Target is the name of the method to be invoked on the client when receiving the message. The Arguments property is an array of zero or more objects to be passed to the client method. In our case we add the properties from the UdfCustomModel we received from the UdfCustom event.
The class should now look something like this:
    public static class EventGridUdfCustomFunction
    {
        [FunctionName("EventGridUdfCustomFunction")]
        public static async Task Run([EventGridTrigger]EventGridEvent eventGridEvent, ILogger log,
            [SignalR(HubName = "NotificationHub")] IAsyncCollector<SignalRMessage> signalRMessages)
        {
            if (eventGridEvent.EventType == "UdfCustom")
            {
                var eventGridEventData = eventGridEvent.Data.ToString();
                var udfCustomEvent = JsonConvert.DeserializeObject<UdfCustomModel>(eventGridEventData);
                await signalRMessages.AddAsync(
                    new SignalRMessage
                    {
                        Target = "UdfCustom",
                        Arguments = new[] {
                            udfCustomEvent.TopologyObjectId,
                            udfCustomEvent.ResourceType,
                            udfCustomEvent.Payload,
                            udfCustomEvent.CorrelationId
                        }
                    });

                log.LogInformation(eventGridEventData);
            }
            else
            {
                log.LogInformation("Not an UdfCustom event");
            }
        }
    }
Now we need to add a second function that the web application will use to obtain a valid SignalR Service access token and service endpoint URL.
[FunctionName("negotiate")]
public static SignalRConnectionInfo GetSignalRInfo(
    [HttpTrigger(AuthorizationLevel.Anonymous, "post")] HttpRequest req,
    [SignalRConnectionInfo(HubName = "NotificationHub")] SignalRConnectionInfo connectionInfo)
{
    return connectionInfo;
}
The SignalRConnectionInfo input binding is used to generate and return valid connection information to the web client that will call this HTTP endpoint when it wants to establish a connection with SignalR.
Make sure to publish the changes to Azure. Then go to the Azure Function in the Azure Portal and add AzureSignalRConnectionString to Application Settings. You can copy the value from local.settings.json. We need to cofigure CORS to be able to call this function from our web application. Navigate to the tab Platform features and section API/CORS. In there enable Access-Control-Allow-Credentials and add the web application URL to the list of Allowed Origins.
Receive message #
Now it is time to make some changes to the web application so we can receive the SignalR messages and update the SVG. We need to be able to connect and interact with the SignalR Hub from the view that will show the floor plan. This will be done with JavaScript and we need the SignalR JavaScript client library for that. Install this package with your preferred package manager (NPM, LibMan) or use a CDN and add a reference to it from the view.
<script src="~/lib/signalr/signalr.js"></script>
We can now create and start a connection with the hub with some JavaScript code:
const connection = new signalR.HubConnectionBuilder().withUrl("https://my-funcapp.azurewebsites.net/api").build();

connection.start().catch(function (err) {
    console.log(err.toString());
});
The URL we use in WithUrl is the endpoint of the negotiate function in the Function App (without the last url segment ‘/negotiate’). By convention, the SDK automatically appends /negotiate to the URL and uses it to begin the negotiation.
To receive messages from the hub, we define a method using the on method of the HubConnection. The name of the method has to match the Target property of the SignalR message we create in the Azure Function.
The array items from the Arguments property of the message will be passed as parameters to the method. Remember these items are the properties of the data object from the UdfCustom event.
connection.on("UdfCustom",
    function (topologyObjectId, resourceType, payload, correlationId) {
    }
});
Read message and update floor plan #
To update the SVG in the view change the method as follows:
connection.on("UdfCustom",
    function (topologyObjectId, resourceType, payload, correlationId) {
        var message = JSON.parse(payload);
        if (message.isAlert === true && message.dataType === "temperature") {
            document.getElementById(topologyObjectId).style.fill = "#99081d";
        }
});
First we parse the payload string to a JSON object. Then we make sure this is a ’temperature alert’.
The topologyObjectId is the Id of the object in a Digital Twin. In our case this is the room for which the temperature alert was raised in the user-defined function. Based on this id we find the corresponding element in the floor plan SVG and change its styling to have a red fill color. Check out the first part of this blog post to see how the SVG is structured.
When the method executes, the page with the floor plan should automatically update and look like this:
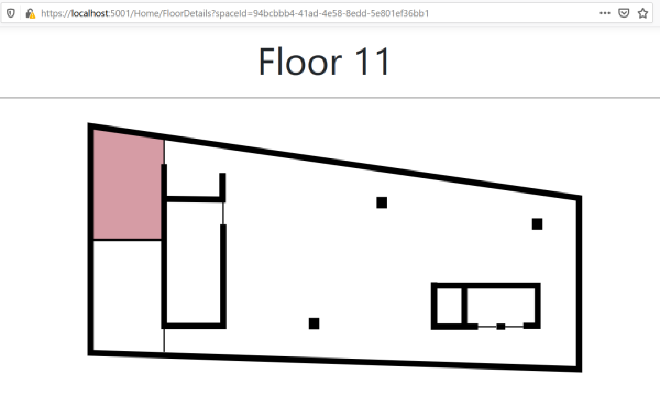
That is it, when the device in the room measures too high a temperature, the room on the floor plan is immediately updated!
Next steps #
Hopefully you now have a good idea of what is possible by combining events triggered by Azure Digital Twins and serverless services like Event Grid, Azure Functions and SignalR service. You can build upon the example shown in this blog post to extend the functionality of the web application. You could respond to SpaceChange events and update a graph with the most recent room temperature values. Or make the styling a bit fancier by adding icons. For example show a thermometer icon in the room on the floor plan when a temperature alert is received.
Resources #
UDF:
- Data processing and user-defined functions
- Tutorial: Provision your building and monitor working conditions with Azure Digital Twins Preview
- UDF Client Library
Event Grid:
Azure Functions:
SignalR: