
In this series of blog posts, we will create a pipeline in Azure DevOps for a LUIS language model. In the pipeline, we will subject the model to various types of tests, after which we will ‘build’ and deploy it to an Azure environment. In this post we will look at the Azure resources and solution files we will be using in the pipeline. We will also briefly cover some Azure DevOps pipelines basics.
The series consists of the following blog posts:
- DevOps for LUIS - part 1: Author workflow
- DevOps for LUIS - part 2: Files, Azure resources, LUIS DevOps basics
- DevOps for LUIS - part 3: Azure DevOps pipeline, Pull request and build stage
- DevOps for LUIS - part 4: Azure DevOps pipeline, Deploy stages
Introduction #
In the previous post we received the LU file from the authors and now it is time to ‘rub some devops on it’ (as Donovan Brown would say). With the ultimate goal to automatically test the language model and roll it out to one or more environments on Azure.
DevOps for LUIS, what’s out there #
Obviously, before I started building the pipeline, I searched for information about CI/CD or DevOps for LUIS, but apart from the Microsoft documentation below, there was not much to be found on this topic at the time of writing:
- Configuring LUIS CI/CD with Azure Pipelines
- Continuous Integration and Continuous Delivery workflows for LUIS DevOps
From the first source I mainly obtained information about how to approach (automatic) testing. The workflow described in the 2nd source was a good guideline for setting up the various stages and conditions in the pipeline.
Based on that I was able to develop a CI/CD pipeline. I will further explain how this came about in this and upcoming posts. Hopefully this end-2-end approach is useful as a starting point for your own LUIS pipelines.
But before we get to that, we first need to create a couple of Azure Resources.
Azure resources #
LUIS resources #
In the pipeline we will need LUIS resources to temporarily place and test a new version. I have chosen to manually create these resources here. It is also possible to create the LUIS resources and application automatically using the Azure CLI, this will be covered in the last blog post. In this way I show you two options and you can decide for yourself what best suits your situation.
To create the required Azure resources you can repeat the steps from the first post:
az group create -l {region} -n {name}
az cognitiveservices account create -n {name} -g {resource-group-name} -l {region} --kind LUIS.Authoring --sku F0
but this time we also want to create a prediction resources where we can run the various tests on:
az cognitiveservices account create -n {name} -g {resource-group-name} -l {region} --kind LUIS --sku S0
Theoretically you could also use the authoring resource but it is limited to 5 requests per second and therefore not very useful when running a large number of test cases.
Azure key vault #
It’s good practice to keep your secrets out of source control. Therefore, we do not add the keys directly to pipeline variables, but store them as secrets in the key vault. We read them out again in the pipeline when we need them.
First create a new key vault:
az keyvault create -n {name} -g {resource-group-name} -l {region}
Now use the following command to get the key (key1) for both the LUIS authoring and prediction resource:
az cognitiveservices account keys list -n {luis-resource-name} -g {resource-group-name}
And add them as secret to the key vault:
az keyvault secret set --vault-name {keyvault-name} --name luisPredictionKey --value {prediction-resource-key1}
az keyvault secret set --vault-name {keyvault-name} --name luisAuthoringKey --value {authoring-resource-key1}
That’s it for the Azure resources. Now, let’s look at the solution and the files we are going to use in the pipeline.
Solution files #
The content of the solution is as follows:
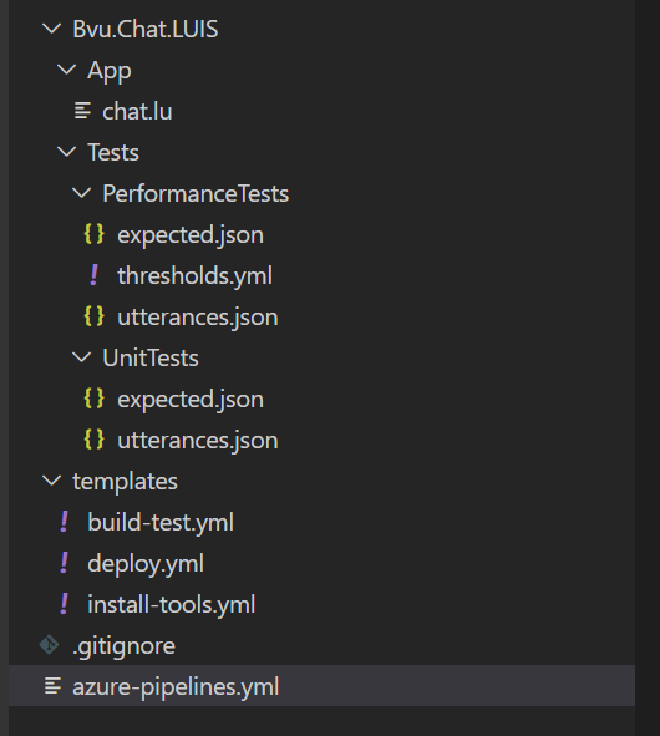
This entire solution containing the Azure DevOps Yaml pipeline and all files used in that pipeline will be made available in this GitHub Repo when the series is completed.
LUIS App (LU file) #
We place the LU file, the export of a version of the LUIS app that we got from the authors, in the App folder. Multiple versions of a LUIS app can be created and exported as a lu or as a json file. In the pipeline we assume that a LU file with the name chat.lu is available.
The LU file can be opened with a text editor such as VS Code. The first block in the file contains the Application Information and includes the name, version and culture of the app.
Pipeline & templates #
The pipeline is in the root folder. The templates used by the pipeline are in the Template folder.
Test files #
The files used for the tests are in the Tests folder. More about testing in a minute. For now it is good to know that we are going to perform different types of tests. And for the tests we use three different test files:
- In
utterances.jsonare the test cases, the sentences used to test the model.. - In
expected.jsonthese sentences are repeated and supplemented with the intent (and entities) that the model should have predicted. So as the file name implies, it contains the expected results. - The
thresholds.ymlfile is used when performing a regression test to set limits for allowed performance degradation.
Testing #
We will be using 3 types of tests in the build pipeline:
- Unit test
- Performance test
- Regression test
Unit test #
In the unit tests we test user input (utterances) of which we require that the expected intent is always correctly recognized by the model. If the correct intent is not recognized for a particular input, the unit test and therefore the build fails.
Performance test #
We use the performance test to gain insight into the performance of the language model and we therefore use much more input than with the unit tests. Due to the large amount of test data, a 100% score is obviously not feasible. In the performance test we accept, in contrast to the unit test, that for some utterances the intent (or entities) is not recognized correctly. As a result of the test, we get the Precision, Recall, F1 score and the number of False Positives (FP) per intent and entity. These performance metrics give us insight into the performance of the tested version of the LUIS app.
We store the results of this performance test and use them as the basis for the regression test.
Regression test #
With a regression test we can prevent a new version from being deployed that performs worse than the current version.
The thresholds are defined in the thresholds.yml file and indicate whether and to what extent a deterioration in performance is acceptable.
The output of the performance test of a previous version serves as the baseline result against which the performance (test result) of the new version is compared.
When this performance difference between these two versions exceeds the thresholds, the regression test and therefore the build will fail.
Azure DevOps Yaml Pipeline - a short intro #
The remainder of this blog post is intended for those who are not yet familiar with Azure DevOps yaml pipelines or need a quick reminder. If you already know the basics you can skip ahead to the next blog post were we go into the details.
Pipeline structure #
A yaml pipeline has the following main structure:
- trigger
- variables
- stages
- stage
- condition
- dependsOn
- jobs
- job
- variables
- steps
- step
- job
- stage
In the trigger we can list the branches that will cause the pipeline to run when an update is pushed to that branch. In this pipeline, these are the develop and main branch. Under variables we can define global variables that can be used throughout the pipeline. We add variables for Azure Subscription and the VM image for the job agent, among others.
Stage #
A stage offers the opportunity to divide the pipeline into various logical separate parts. In this pipeline we define the following stages:
- Pull Request - Validates the performance of the LUIS app when a pull request is made.
- Build - Checks the performance of the LUIS app again and creates build artifacts.
- QA - Deploys the app to the QA environment
- PRD - Deploys the app to the production environment
By means of the condition property in a stage, we can determine when a stage should be run or skipped. For example, the Pull Request stage will only be executed when there is a pull request, the Build stage when there is no pull request and the PRD stage is only executed when the pipeline has been triggered by the main branch.
With the dependson property we can make a stage dependent on (an)other stage(s). A stage cannot be executed until the stage on which it depends has been executed. By default a stage is always dependent on the previous stage. This can be overruled by giving an empty array as the value dependsOn: []. We do this eg in the Build stage to make it independent of the Pull Request stage. This way we prevent the pipeline from continuing before the pull request is approved.
If a stage uses build artifacts published in a different stage, they are only available if that stage is added to the dependsOn property. For example, the deploy stages (QA and PRD) depend on the build artifacts from the Build stage and this is therefore included in the dependsOn of the deploy stages. This however also removes the implicit dependence on a previous stage. So to prevent all deploy stages from running in parallel after the build stage is completed, the dependency between the different environments is made explicit.
So for the PRD stage then applies:
dependsOn:
  - Build
  - QA
Job #
The Pull Request and Build stage use a traditional Agent pool job. A Deployment job is used in the deploy stages. For YAML pipelines it is recommended to perform deployment actions in a deployment job. The deployment actions are performed on the specified environment according to the specified strategy. The strategy is not that important for this pipeline, so we opted for the simplest one, runOnce. For environment, QA and PRD have been chosen. The environments are also visible in Azure DevOps under Pipelines > Environments.
Steps #
The steps are the tasks (a.k.a. actions) that are performed in the job, we will look at this in more detail per stage.
Barebones structure #
So after omitting most of the variables and steps details, the pipeline will look like this:
trigger:
  - develop
  - main

variables:
  AzureSubscription: 'your azure subscription (********-****-****-****-************)'

stages:
  - stage: PullRequest
    condition: eq(variables['Build.Reason'], 'PullRequest')
    jobs:
    - job: Agentjob
      steps:

  - stage: Build
    dependsOn: [] # removes the implicit dependency on previous stage and causes this to run in parallel
    condition: and(succeeded(), ne(variables['Build.Reason'], 'PullRequest')) # do not run in case of a pull request
    jobs:
    - job: CiBuildJob
      steps:

  - stage: QA
    dependsOn: Build
    jobs:
      - deployment:
        environment: QA
        strategy:
          runOnce:
            deploy:
              steps:

  - stage: PRD
    condition: eq(variables['build.sourceBranch'], 'refs/heads/master')
    dependsOn:
      - Build
      - QA
    jobs:
      - deployment:
        environment: PRD
        strategy:
          runOnce:
            deploy:
              steps:
In the next blog posts we will look in detail at the content of the different stages of the pipeline.
Resources #
LUIS CI/CD:
- Configuring LUIS CI/CD with Azure Pipelines
- Continuous Integration and Continuous Delivery workflows for LUIS DevOps
Azure DevOps yaml pipelines: