
In this series of blog posts, we create a CI/CD pipeline in Azure DevOps for a LUIS language model. In the pipeline, we will subject the model to various types of tests, after which we will ‘build’ and deploy it to an Azure environment.
In the last two blog posts of this series we will finally take a detailed look at the pipeline. In this post we will cover the first two stages of the pipeline namely the Pull Request and Build stage. The emphasis in these stages is on testing and evaluating the model. The last blog post will cover deploying the model to an Azure environment.
The entire series consists of the following blog posts:
- DevOps for LUIS - part 1: Author workflow
- DevOps for LUIS - part 2: Files, Azure resources, LUIS DevOps basics
- DevOps for LUIS - part 3: Azure DevOps pipeline, Pull request and build stage
- DevOps for LUIS - part 4: Azure DevOps pipeline, Deploy stages
The solution containing the Azure DevOps Yaml pipeline and all files used in the pipeline is available in this GitHub Repo.
Prerequisites #
We assume the following situation with regard to the available versions of the LUIS app:
- version 1.0 has been processed by an earlier run of the pipeline and is deployed the target environments (QA and PRD)
- version 1.1 has been exported to file chat.lu, added to source control and is now ready to be processed by the pipeline.
The LUIS model and test files are based on the Azure sample LUIS-DevOps-Template. I simplified the test files by removing the entity recognition check.
LUIS app #
Go to the LUIS portal and select the LUIS authoring resource you created in the previous post on the Conversation apps screen. Then click on New app to create a new LUIS conversation app. The name is not that important, I called it chat-pipeline to indicate that it is only used in the pipeline.
I realise you might not like the idea of manually creating the Azure LUIS resource and the LUIS app. One might argue that, since we are doing CI/CD, they should be automatically created in the pipeline. As the app is just a helper app to test and evaluate the model, I’m fine with using the manual approach here. In the next blog post however, I will show you how to automatically create the LUIS resources and a LUIS app from the pipeline when we deploy the model to Azure. If you prefer, you can use the same approach here.
Pipeline variables #
First we can set some global variables that we can use in all the stages. The value for LuisEndpoint is the Endpoint URL of the prediction resource and can be found in the LUIS portal under Manage > Azure Resources > Prediction Resource. Here you can also find the Location used for LuisLocation.
variables:
  AzureSubscription: 'Visual Studio Enterprise – MPN (********-****-****-****-************)'
  AzureSubscriptionId: '********-****-****-****-************'
  LuisLocation: 'westeurope'
  LuisEndpoint: 'https://westeurope.cognitiveservices.azure.com/'
  VmImage: 'windows-latest'
Templates #
We use templates to reuse steps that occur multiple times in the pipeline. This way we keep it DRY ;-)
Install-tools template #
The install-tools template installs two command-line interfaces:
- Bot Framework Command-Line Interface (CLI)
CLI tool for Microsoft Bot Framework and related services including LUIS. This allows us to import, train and publish versions of a LUIS app. - NLU.DevOps Command-Line Interface (CLI)
We use this tool to perform unit, performance and regression tests. An Azure DevOps extension has also been created for this tool. But since it is only a wrapper around the commands I decided to use the commands directly in the tasks.
Build-test template #
In this template we will add the steps needed to import, train, publish and test the LUIS app. I have used the term ‘build’ in the template name because the steps to import, train and publish the LUIS app have the same purpose as building a normal application, which is to make it ready for use.
Part of the tests is a regression test in which the result of a previous version of the app is used as the baseline. This result is available in a build artifact of a previous build and must be downloaded prior to the regression test. Because this pipeline is triggered by updates on both the develop and master branch, we could have a previous build for both branches. In our case we have a build artifact containing version 1.0 on both the develop and master branch.
To ensure that we download the correct build artifact, the DownloadBuildArtifactsBranchName parameter has been added to this template. We need to provide a value for the parameter when we add the template to the pipeline.
Pull Request stage #
Variables #
First we get some values from the LUIS app chat-pipeline and use them to set some job variables.
variables:
  LuisAppId: '********-****-****-****-************'
  LuisVersionId: 'pullrequest'
The LuisAppId can be found in the LUIS portal under Manage > Settings as App ID. LuisVersionId is the Id of the temporary version we will create and delete in this pipeline stage.
Steps #
Azure key vault #
We first add an AzureKeyVault task to get the LUIS keys we need.
- task: AzureKeyVault@1
  displayName: Get LUIS keys from Azure key vault
  inputs:
    azureSubscription: $(AzureSubscription)
    KeyVaultName: 'your key vault name'
    SecretsFilter: 'LuisPredictionKey,LuisAuthoringKey'
We use the Azure key vault that we created in the previous post and indicate in the SecretsFilter that we only use the LuisPredictionKey and LuisAuthoringkey. At the moment this is not really necessary as we only have these two secrets in the key vault, but this prevents you from retrieving secrets that are not needed. In case you add more in the future. The two secrets contain the primary key of the LUIS authoring and prediction resource that we already added in the previous blog post.
When you run the pipeline for the first time you might get an error like this:
"The user, group or application 'appid=***;oid=********-****-****-****-************;iss=https://sts.windows.net/***/' does not have secrets get permission on key vault 'yourkeyvault;location=westeurope'.
For help resolving this issue, please see https://go.microsoft.com/fwlink/?linkid=2125287.
The specified Azure service connection needs to have Get, List secret management permissions on the selected key vault.
To set these permissions, download the ProvisionKeyVaultPermissions.ps1 script from build/release logs and execute it, or set them from the Azure portal."
This is because the pipeline doesn’t have permission to access the key vault yet. To fix this navigate to the Access policies blade of the key vault and add an access policy. Select Get and List from the Secret permissions dropdown. And for Principal search for the oid value mentioned in the error description.
Now we add the two templates that contain the remaining steps for this stage.
Add templates #
First we add the install-tools template to the job steps:
- template: templates\install-tools.yml
Then we add the build-test template.
We give DownloadBuildArtifactsBranchName parameter the value of the target branch of the pull request. So when we do a pull request on the develop branch, we download the most recent build artifact that was made on the develop branch.
- template: templates\build-test.yml
  parameters:
    DownloadBuildArtifactsBranchName: '$(System.PullRequest.TargetBranch)'
Now that we’ve added the templates, let’s take a closer look at their content. This will give us a complete overview of all the steps performed in this stage.
Install-Tools template #
We add the following tasks to the install-tools template to install the necessary tooling:
steps:
  - task: Npm@1
    displayName: Install bot framework cli
    inputs:
      command: custom
      customCommand: 'install @microsoft/botframework-cli -g'

  - task: DotNetCoreCLI@2
    displayName: 'Install dotnet-nlu'
    inputs:
      command: custom
      custom: tool
      arguments: install dotnet-nlu --tool-path $(Agent.TempDirectory)\bin

  - powershell: Write-Host "##vso[task.prependpath]$(Agent.TempDirectory)\bin"
    displayName: Prepend .NET Core CLI tool path
The Bot Framework CLI is an npm package so it is installed in an Npm task. The NLU.DevOps CLI is a .NET Core tool so to install it on the job agent we use the DotNetCoreCLI task. Then we add the location of the tool to the PATH environment variable so that the command is recognized in later steps.
Write-Host "##vso[task.prependpath]$(Agent.TempDirectory)\bin"
Build-Test template #
Parameter #
We’ve already covered this, the pipeline specifies the name of the branch to get the build artifact for, as the value for this parameter.
parameters:
  - name: DownloadBuildArtifactsBranchName
Steps #
Set Bot Framework CLI config #
First, we add some default values for frequently used command options, such as the appId and authoringKey of the LUIS application, to the tool’s configuration. The tool can read these back out from the config when they are required for a command. This means that we do not have to explicetly add them, which makes the commands a bit more compact and easier to read.
- script: bf config:set:luis --appId $(LuisAppId) --authoringKey $(LuisAuthoringKey) --endpoint $(LuisEndpoint) --subscriptionKey $(LuisAuthoringKey)
  displayName: Set LUIS config for bot framework cli
  failOnStderr: true
The script keyword is a shortcut for the command-line task.
The Bot Framework CLI does not return an exit code from which can be determined whether an error has occurred. Therefore we set failOnStderr to true which will cause the task to fail if the command fails and errors are sent to the error stream (stderr). For example when importing an existing version:
##[error]Failed to clone app: Error: An application version with the same version ID (1.0) already exists.
Import app #
We use the LU file (chat.lu) from source control to import a new version of the LUIS app. The versionId is specified in the job variable LuisVersionId.
- script: bf luis:version:import --in $(Build.SourcesDirectory)\Bvu.Chat.LUIS\App\sam.lu --versionId $(LuisVersionId)
  displayName: Import LUIS app (lu) from source
  failOnStderr: true
Train app #
Then we train the app. Training is asynchronous so we have to add the wait flag to avoid starting the next task before the training is complete.
- script: bf luis: train:run --versionId $(LuisVersionId) --wait
  displayName: Train LUIS app
  failOnStderr: true
Publish app #
The app has been trained and can now be published. There are two endpoints that can be published to, Production and Staging. By default, it is published to production. Publishing to the staging endpoint can be done by adding the staging flag to the command.
- script: bf luis:application:publish --versionId $(LuisVersionId) --staging
  displayName: Publish LUIS app to staging endpoint
  failOnStderr: true
The LUIS app is now up and running and ready to be tested. For this we switch to the NLU DevOps tool.
Set NLU CLI config #
As with the Bot Framework CLI, we also configure the NLU DevOps CLI with some properties of the LUIS application. Here we do this by assigning them to variables so that they are available as environment variables for subsequent tasks. These variables are then used to automatically add options to commands when they are required. Just like with the Bot Framework tool, but in a different way.
- powershell: |
    # set environment variables
    Write-Host "##vso[task.setvariable variable=luisEndpointKey]$(LuisKey)"
    Write-Host "##vso[task.setvariable variable=luisEndpointRegion]$(LuisEndpointRegion)"
    Write-Host "##vso[task.setvariable variable=luisAppId]$(LuisAppId)"
    Write-Host "##vso[task.setvariable variable=luisIsStaging]true"
  displayName: Set config for dotnet-nlu
The powershell keyword is a shortcut for a PowerShell task. More information about how to set variables in scripts can be found here.
Unit tests #
We first perform the unit tests and then we compare the results with the expected results (Act and Assert). Because the NLU.DevOps CLI is a dotnet tool, we can use the DotNetCoreCLI task to execute the commands.
- task: DotNetCoreCLI@2
  displayName: Unit Test LUIS app
  inputs:
    command: custom
    custom: nlu
    arguments: test
      --service luis
      --utterances $(Build.SourcesDirectory)\Bvu.Chat.LUIS\Tests\UnitTests\utterances.json
      --output $(Agent.TempDirectory)\unittest\output\results.json
This task will generate and execute this command:
dotnet nlu test --service luis --utterances $(Build.SourcesDirectory)\Bvu.Chat.LUIS\Tests\UnitTests\utterances.json --output $(Agent.TempDirectory)\unittest\output\results.json
When running the unit tests, we get the test cases (utterances) from source control (Tests\UnitTests\utterances.json). In the output option we specify where to temporarily store the predicted intents (actual values) in order to compare them with the expected results.
This comparision is done in the following task:
- task: DotNetCoreCLI@2
  displayName: Compare the unit test results with the expected results
  inputs:
    command: custom
    custom: nlu
    arguments: compare
      --expected $(Build.SourcesDirectory)\Bvu.Chat.LUIS\Tests\UnitTests\expected.json
      --actual $(Agent.TempDirectory)\unittest\output\results.json
      --output-folder $(Build.ArtifactStagingDirectory)\unittest
      --unit-test
  continueOnError: true
The expected values, so the expected intents for the given utterances, are in source control (expected.json in the Tests\UnitTests folder). Note ⚠: The number of test cases in utterances.json and expected.json must be the same and they must be in the same order.
In the output-folder option we indicate where to save the result (TestResult.xml) of the comparison (the assert part of the unit test). The ArtifactStagingDirectory was chosen here because we are going to publish the result as a Test Result.
The unit-test flag is set to treat each utterance as a unit test and generate a non-zero exit code if a unit test fails. A unit test fails if a false negative (or false positive) intent is predicted for the utterance and the task will fail due to that non-zero exit code. In that case, however, we want the build to continue (continueOnError: true) so that we can still publish the test results in the PublishTestResults task and make them available in Azure DevOps. Only then will we let the task fail.
Performance test #
We use the same tasks and commands for the performance test as for unit testing. We do use a different utterances.json and expected.json file (this time from the Tests\PerformanceTests folder) and when comparing, we now omit the unit-test flag so that the task does not fail with false negatives or false positives found. Read the previous post if you want to know the reason for this. We also store the results in different folder.
- task: DotNetCoreCLI@2
  displayName: Performance Test LUIS app
  inputs:
    command: custom
    custom: nlu
    arguments: test
      --service luis
      --utterances $(Build.SourcesDirectory)\Bvu.Chat.LUIS\Tests\PerformanceTests\utterances.json
      --output $(Agent.TempDirectory)\performancetest\output\results.json

# this also creates a new baseline to use for regression testing
- task: DotNetCoreCLI@2
  displayName: Compare the performance test results with the expected results
  inputs:
    command: custom
    custom: nlu
    arguments: compare
      --expected $(Build.SourcesDirectory)\Bvu.Chat.LUIS\Tests\PerformanceTests\expected.json
      --actual $(Agent.TempDirectory)\performancetest\output\results.json
      --output-folder $(Build.ArtifactStagingDirectory)\performancetest
The result of this test will be used as the baseline (performance) for the regression test of the next version of the language model.
Delete app #
An existing version will not be overwritten by an import file that has the same versionId.
Because we will be using the same versionId every time this build runs we need to remove the app after each build to avoid accidentally continuing to work with an outdated model in future builds. To make sure that this version is removed successfully we fail the job if the delete fails (failOnStderr: true).
- script: bf luis:version:delete --versionId $(LuisVersionId)
  displayName: Delete temporary version
  failOnStderr: true
Publish test results #
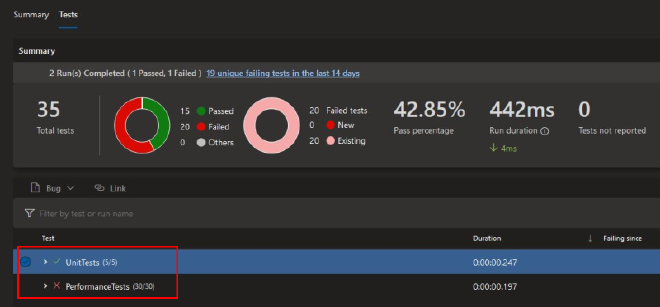
Now we publish the results of the unit and performance tests to make them available in the build summary under Tests and coverage
- task: PublishTestResults@2
  displayName: Publish performance test results
  inputs:
    testResultsFormat: NUnit
    testResultsFiles: $(Build.ArtifactStagingDirectory)\performancetest\TestResult.xml
    testRunTitle: PerformanceTests

- task: PublishTestResults@2
  displayName: Publish unit test results
  inputs:
    testResultsFormat: NUnit
    testResultsFiles: $(Build.ArtifactStagingDirectory)\unittest\TestResult.xml
    testRunTitle: UnitTests
    failTaskOnFailedTests: true
If a unit test failed, we previously let the build continue, but now that the results are published, we can still fail the build (failTaskOnFailedTests: true).
Regression test #
As explained earlier, in the regression test we compare the results of the new version (1.1) with the latest version (1.0) of the app, which was deployed in an earlier build. The result of the latest version is stored in the PerformanceTestResult artifact of the last successful build for the branch (more on this later in this post when we discuss the Build stage). We’re adding a DownloadBuildArtifact task that downloads the latest version of the artifact for a specific branch. In the pipeline we passed this branch name to the template as a parameter. Again, the latest version is available in latest completed build for this branch. Note ⚠: Any artifacts in failed or pending builds will not be used.
- task: DownloadBuildArtifacts@0
  displayName: Download latest performancetest results from target branch
  enabled: true  #disable task for very first build because there will be no build artifact available for download
  inputs:
    buildType: specific
    project: $(System.TeamProject)
    pipeline: $(Build.DefinitionName)
    buildVersionToDownload: latestFromBranch
    branchName: ${{parameters.DownloadBuildArtifactsBranchName}}
    downloadType: single
    artifactName: PerformanceTestResult
    downloadPath: $(Agent.TempDirectory)\latestfrombranch
Once downloaded we can compare it with the performance test results of the new version:
- task: DotNetCoreCLI@2
  displayName: Compare the performance test results with the baseline
  enabled: true #disable task for very first build because there is nothing to compare with
  inputs:
    command: custom
    custom: nlu
    arguments: compare
      --expected $(Build.SourcesDirectory)\Bvu.Chat.LUIS\Tests\PerformanceTests\expected.json
      --actual $(Agent.TempDirectory)\performancetest\output\results.json
      --test-settings $(Build.SourcesDirectory)\Bvu.Chat.LUIS\Tests\PerformanceTests\thresholds.yml
      --baseline $(Agent.TempDirectory)\latestfrombranch\PerformanceTestResult\statistics.json # result from previous successful build
As a result of the performance test, a statistics.json file is available in the artifact in addition to TestResult.xml. We use this result (= performance of the latest version) as a baseline to test the new version. In the test-settings parameter we include the thresholds.yml file in which is determined whether, and to what extent, a performance decline is allowed. By default it contains the following values:
thresholds:
- type: intent
  group: '*'
  threshold: 0
- type: entity
  group: '*'
  threshold: 0
This causes the compare command to fail if the F1 score of one of the intents or entities is worse than the previous version. However, this can be adjusted as desired by specifying the threshold per intent or entity. For example, it is possible to be more or less strict for certain intents than for others. More information about the thresholds can be found here. If the requirements are not met, a non-zero exit code will be given by the command (just as with failing unit tests) causing the task and therefore the build to fail.
With that, the last task in the build-test template has been executed and we return to the steps of the job that is currently being executed. There are no additional steps defined for the job in the Pull Request stage, which means that the job and the stage are completed. Due to the specified condition in the next stage, this and all other stages will be skipped and the build is completed.
If the unit and regression tests all passed, the build is successful and the pull request can be further reviewed and eventually approved.
Build stage #
The first part of the Build stage is basically the same as the Pull Request stage. We get secrets from the key vault, install the necessary tooling and run all the tests again. Then a number of extra steps follow. These are further described below.
Variables #
variables:
  LuisAppId: '********-****-****-****-************'
  LuisVersionId: 'ci'
The LuisAppId has the same value as in the previous stage. LuisVersionId is arbitrary once again. Name it however you like.
Steps #
The steps to get secrets from the key vault and to add the install-tools template are exactly the same as in the Pull Request stage.
For the build-test template we now pass the branch name on which the build was started ($(Build.SourceBranch)) as the value for the DownloadBuildArtifactsBranchName parameter.
- template: templates\build-test.yml
  parameters:
    DownloadBuildArtifactsBranchName: '$(Build.SourceBranch)'
After the steps from the build-test template are completed we return to the job to run some extra steps.
Publish build artifacts #
In addition to the steps from the Pull Request stage, we are now also publishing two build artifacts, the LUIS app (chat.lu) and the results of the performance test. We use the LU file in the following stages to deploy this version (1.1) to the different environments. We publish the performance test results so that they are available as a baseline result for the performance test of future versions in upcoming builds.
- task: PublishBuildArtifacts@1
  displayName: Publish LUIS app source file
  inputs:
    PathtoPublish: '$(Build.SourcesDirectory)\Bvu.Chat.LUIS\App'
    ArtifactName: 'LuisApp'
    publishLocation: 'Container'

- task: PublishBuildArtifacts@1
  displayName: Publish performance test result
  inputs:
      PathtoPublish: $(Build.ArtifactStagingDirectory)\performancetest
      ArtifactName: 'PerformanceTestResult'
      publishLocation: 'Container'
Get VersionId #
In the following stages we will deploy the model. For this we use the import command, just like in the Pull Request stage. Then we used a fictitious value for versionId (‘pullrequest’), but now we must of course use the actual version of the model. The versionId of the model is stored in the LU file. The next step is to read out the versionId and save it as a variable that can be used later in the deploy stages. First we convert the LU file to a JSON file because it is easier to work with using Powershell.
- script: bf luis:convert -i $(Build.SourcesDirectory)\Bvu.Chat.LUIS\App\chat.lu -o $(Build.SourcesDirectory)\Bvu.Chat.LUIS\App\sam.json
  displayName: Convert LUIS app (lu to json)
  failOnStderr: true
Then we use Powershell to read the file as a JSON string and then convert it to an anonymous object using the ConvertFrom-Json cmdlet.
After that, the version is easy to read as versionId property of the object. We put this in an environment variable that we mark as an output variable by using isOutput=true. This makes this variable available to future jobs. When referring to such an output variable in future jobs it is necessary to include the task name as well, so we’ll add that at the end.
- powershell: |
    $model= Get-content $(Build.SourcesDirectory)\Bvu.Chat.LUIS\App\sam.json | out-string | ConvertFrom-Json
    $versionId = $model.versionId
    Write-Host $versionId

    Write-Host "##vso[task.setvariable variable=luisVersion;isOutput=true]$versionId"

  displayName: Get LUIS app versionId and set as output variable
  name: Versiontask
Wrap up #
In this rather long post we covered the Pull Request and Build stage of the pipeline in which we tested the model and made preperations to release it to one or more Azure environments. In the next and final blog post of this series, we look at the steps to deploy the model. This time, no manual steps will be involved, I promise ;-).
Resources #
Powershell:
Azure DevOps yaml pipelines:
Bot Framework CLI:
NLU.DevOps CLI: